The Best Way to Convert Old DWG Drawings to 3D Models

Here’s a scenario that so many engineering companies face: you have a very old legacy drawing that you need to update to match your current catalog. The only problem is that your old DWG drawing can’t be edited, which means you can’t make any changes. What are you supposed to do? This is where a conversion from an old DWG to a new 3D model comes in.
In this guide, we’ll review the 6 steps you need to follow in order to convert an old DWG drawing into a fresh 3D model. We also have a way to speed up the process and save money — let’s get started.
Lots of Old DWGs are Obsolete Now
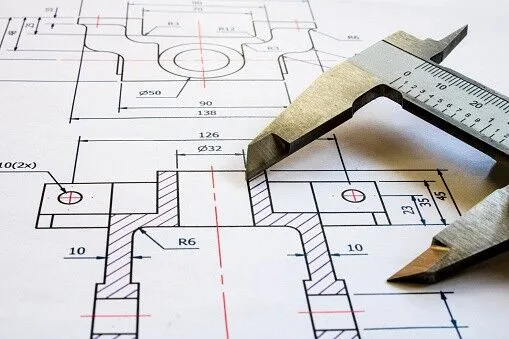
If you have old DWG files, they’re probably made in 2D on an older version of AutoCAD — way back when you had to type every command and there weren’t any useful buttons like there are today. Plus, back then, all you could work in was 2D.
Today, 3D CAD models are incredibly popular. As a result, these old DWG drawings are basically useless. They can’t easily be converted into 3D, they can’t be shared with a machine shop for fabrication, and they definitely can’t be adjusted. This is why it’s so important to convert them into 3D models.
Why 3D Models are the Way of the Future
3D models are the most useful CAD files for engineers today. Most engineering companies in America rely on 3D models for a number of reasons.
Create Lifelike Renders for Stakeholder Buy-In
One benefit of 3D CAD programs like Inventor or SolidWorks is that you can create truly lifelike renders. We’ve seen 3D renders that were hard to differentiate from actual photographs of different products, that’s how good the software is.
What can these renders be used for? Gaining stakeholder buy-in, used on sales catalogs, or used to sell your product to people. There are countless reasons you would want high-quality images of your 3D models.

Check for Fits, Structural Rigidity, and Feasibility
From a functional perspective, 3D CAD models can do so much more than 2D DWG files. You can check the fit between multiple parts in a high-quality assembly and do robust feasibility testing. All of these checks are done on the screen, without the need to even build a prototype.
Again, this is something that 2D DWG files definitely can’t do.
Do Non-Destructive Testing Before Production
You can also go through a host of non-destructive tests before you start manufacturing your parts. Go through an FEA to minimize manufacturing cost while meeting load constraints, do thermal cycle testing to see how long your part will last, and put your part in a simulated wind tunnel to check its aerodynamics.
These simulations can help a lot during the design phase, which expedites your time to market.
The Best Way to Convert Old DWG Drawings to 3D Models
We’ve converted so many drawings over the decades that we’ve honestly lost count — it’s in the millions. So, we know exactly how this conversion process works. Let’s discuss the 6 steps you’ll follow to convert an old DWG drawing to a new 3D model.
Step 1: Open the Old DWG File
It all starts with the old DWG file. You’ll need a program that can still open the file. AutoCAD will likely be able to handle it if AutoCAD was used back in the day to make the original DWG. Otherwise, you’ll need advanced software to open it (CAD/CAM Services can help with this).
Once opened, make sure the part looks correct. You might only be able to see it through a DWG Viewer, which won’t let you alter the part but will allow you to look at it.
Step 2: Select and Open Your 3D CAD Software
Next, you’ll have to figure out which 3D CAD program you want to use. The most popular options today are NX, CATIA, Creo, SolidWorks, or Inventor. If you already have a license for one of these 3D CAD programs, you’re fine. If not, you’ll have to either outsource the rest of this work or purchase a license for thousands of dollars.
Step 3: Carefully Redraw Every Line as Sketches in 3D CAD
The huge downside is that you can’t just “Save As” the old DWG file into a new 3D model. You’ll have to painstakingly redraw every single line, feature, and geometry from the original into the 3D program. For instance, to transfer over a rectangle from an old DWG drawing, you’ll need to draw a rectangle from scratch on your 3D CAD program.
Make sure you triple-check the dimensions for each line before drawing them on your new CAD program, or else your part won’t be right.
Since you’re starting with 2D drawing views, it’s probably best to tackle this as multiple sketches on your 3D CAD program.
Step 4: Bring Your Sketches into 3D and Repeat
With one sketch completed, you’ll have to extrude, revolve, or loft the part to bring it into the third dimension (to make it a 3D CAD model).
Now, you’ll have to repeat the process for each view you have on your original drawing. Most of the time this means making three different sketches and performing different 3D functions before you get the final part in 3D.
Step 5: Go Through Quality Checks and Peer Reviews
We don’t suggest publishing any drawing until you go through a full quality check process and at least one peer review. For each of these checks, you’ll be comparing the 3D model to the original 2D DWG drawing.
Make sure that the dimensions are perfect, everything matches, and the 3D model is complete before moving forward. A peer review will catch any small details that you might have missed.
Step 6: Publish the 3D Model and Move to the Next DWG File
Now you’re ready to publish the model and move on to your next DWG drawing conversion. What might not be clear yet is how long this process takes. For an untrained person, it could take days to do a single conversion. If you have a digital pile of DWG files that you need to convert, your engineers could be tied up for months.

Consider Saving Time and Money by Outsourcing the Work
The best way to save time and money during this process is to outsource your DWG drawing to 3D model conversion. With a professional team like ours at CAD/CAM Services, you can get results in a fraction of the time for a fraction of the cost.
This frees up your in-house engineers to work on other project-critical projects while we tackle the meticulous process of converting your old 2D drawings into 3D models. The best part? You’ll get CAD Perfect results without spending any time working on the conversion.
Conclusion
You just learned 6 steps to convert an old DWG drawing into a functional 3D model. It’s a slow and meticulous process, but it’s unavoidable for modern-day engineering companies. For the best results, you can trust our team at CAD/CAM Services.
We’ve been converting drawings and making models from scratch for decades. With a team of over 100 engineers and draftsmen working around the clock, you can get results in as little as 24 hours. Get a free quote today.
Recent Posts


5 Common CAD Mistakes and How to Avoid Them
We came up with 5 common issues that we see, and our expert advice when it comes to avoiding these issues.

Techniques to Save Money on Manufacturing Your 3D CAD Model
Our team of outsourced CAD experts wants to talk about ways that your engineering team can save money on manufacturing with each 3D CAD model in 2024.

Shortcuts to Save Time on CAD Conversions
a quick tip to save money on each of your CAD conversions
